How to Grow Mushrooms at Home in Buckets – Harvest Multiple Times
Growing mushrooms at home is a delicious and sustainable hobby that rewards you with the tasty goodness of freshly harvested mushrooms. Among the various methods available, using buckets with holes stands out for its simplicity and effectiveness. Follow this step-by-step guide to embark on your own mushroom growing adventure, enjoying multiple harvests in the comfort of your home.
Materials Needed:
Straw
Water
Large pot for boiling
Mushroom seeds (mycelium)
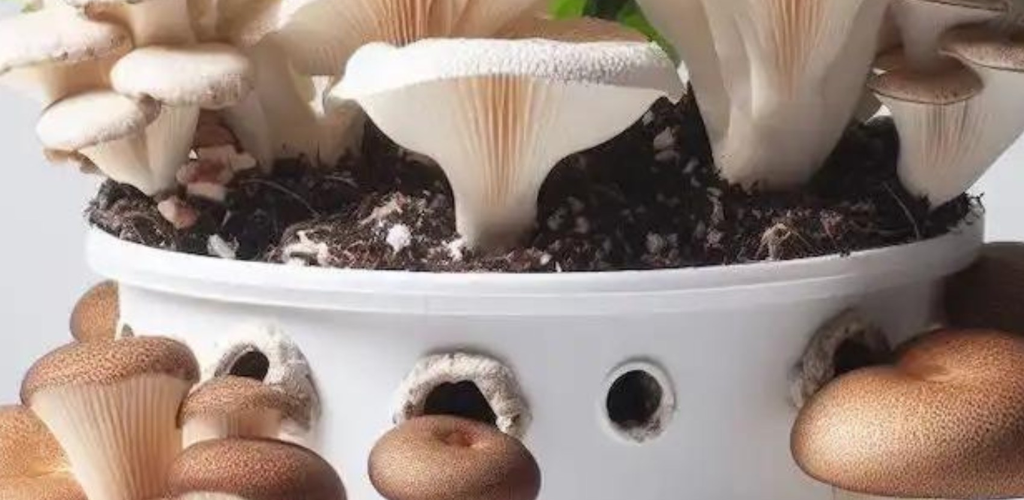
Plastic buckets with holes
Clean cloth or lid to cover the buckets
Watering can or spray bottle
A cool, dark place for incubation
Step 1: Prepare the Straw
Start by gathering an appropriate amount of straw. Wheat or oat straw are ideal for growing mushrooms. Cut the straw into pieces about 5 to 10 centimeters in length.
Step 2: Boil the straw
Put the cut straw in a large pot and cover it with water. Bring the water to a boil and simmer to sterilize the straw. Once boiled, let the straw cool to room temperature.
Step 3: Acquiring mushroom seeds
Buy mushroom seeds, known as mycelium, from a reliable supplier. Different species of mushrooms like oyster mushrooms, shiitake mushrooms or button mushrooms are available depending on your preference.
Step 4: Layering straw and mushroom seeds
Take a plastic bucket with holes and start layering. Start with a layer of cooled boiled straw at the bottom. Spread the mushroom seeds evenly over the straw. Repeat this layering process until the bucket is almost full, ending with a top layer of straw. Ensure even distribution for optimal mushroom growth.
Step 5: Incubation
Cover the bucket with a clean cloth or a lid with small holes to allow air circulation. Place the bucket in a cool, dark place with temperatures ranging from 21°C to 24°C. During this incubation period, the mycelium, which serves as the mushroom’s root system, will colonize the straw.
Step 6: Daily Watering
Maintain consistent moisture levels by watering the mushrooms once or twice a day using a watering can or spray bottle. Avoid overwatering, as excessive moisture can lead to contamination.
Step 7: Harvest
Approximately 21 days later, small mushroom buds will appear on the surface of the straw. Continue to maintain moisture levels. These buds will develop into mushrooms. Harvest by gently twisting and pulling them from the substrate when they reach the desired size.
Step 8: Continuous Harvests
Enjoy multiple harvests by picking mushrooms before they release spores. This practice helps prevent future crops from being affected.
Warning:
Growing mushrooms at home requires attention to detail and proper sterilization to prevent contamination. Follow safety guidelines when handling potentially contaminated materials or consuming home-grown mushrooms. When in doubt, consult local experts or mycology professionals for advice.
Growing mushrooms at home using buckets with holes is an extremely rewarding and relatively simple process. By following these instructions, enjoy a steady supply of fresh, home-grown mushrooms throughout the year. Experiment with different mushroom species and techniques to elevate your culinary experiences. Happy mushroom growing!