17.03.2025
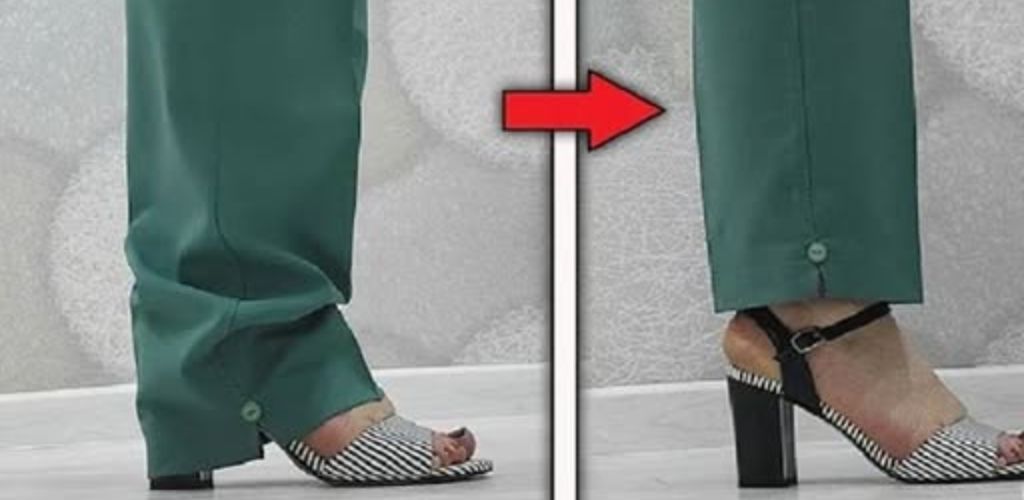
Forget the seamstress; to shorten your pants, all you need is a needle and a tape measure—you’ll save a lot!
While a seamstress certainly offers professional results, you absolutely can shorten your pants at home with just a needle, thread, and measuring tape! Here’s a step-by-step guide to help you do it successfully:
What You’ll Need:
- Pants
- Measuring tape
- Straight pins
- Needle
- Matching thread
- Scissors
- Iron (optional, but recommended)
- Marking tool (tailor’s chalk or fabric marker)
Steps:
- Try on the Pants:
- Put on the pants and the shoes you plan to wear with them.
- Stand in front of a mirror.
- Determine the Desired Length:
- Decide where you want the hem to fall.
- Have someone help you pin the pants to the desired length, or carefully pin them yourself.
- Make sure both legs are pinned evenly.
- Measure and Mark:
- Take off the pants and lay them flat.
- Measure the distance from the original hem to the pins on both legs.
- Use the marking tool to mark this measurement around the entire circumference of both pant legs.
- Add an extra 1-2 inches for the hem allowance (the fabric that will be folded up). Mark this new line as well.
- Cut the Excess Fabric:
- Carefully cut along the second marked line (the one with the hem allowance).
- Prepare the Hem:
- Fold the raw edge of the fabric up to the first marked line (the desired length).
- Iron the fold to create a crisp crease.
- Fold the fabric up again, encasing the raw edge within the hem. Iron this fold also.
- Pin the hem in place all the way around both legs.
- Sew the Hem:
- Thread your needle with matching thread.
- You can use a hand-sewing technique like a blind hem stitch, a slip stitch, or a simple running stitch.
- Start by securing the thread with a knot.
- Sew along the folded edge of the hem, keeping your stitches small and even.
- Continue sewing all the way around both pant legs.
- Secure the thread with a knot and trim any excess.
- Iron the Hem:
- Iron the finished hem to create a smooth, professional look.
- Try on the Pants:
- Put on the pants to check the length and ensure the hem looks even.
Tips:
- For thicker fabrics, you may need a stronger needle and thread.
- If you’re unsure about your sewing skills, practice on a scrap piece of fabric first.
- If you’re shortening jeans, you may want to keep the original hem for a more authentic look. This involves carefully cutting the pant legs above the original hem, then reattaching it.
- If you are shortening dress pants, a blind hem stitch will give a very clean look.
By following these steps, you can successfully shorten your pants at home and save yourself a trip to the seamstress!